Introduction
In the UC Premier curriculum, we are expecting teams in the 9v9 format to use a “base” 1-3-2-3 system of play – 1 GK, 3 backs, 2 midfielders, and 3 forwards. The formation, position numbers, and position names are illustrated below:
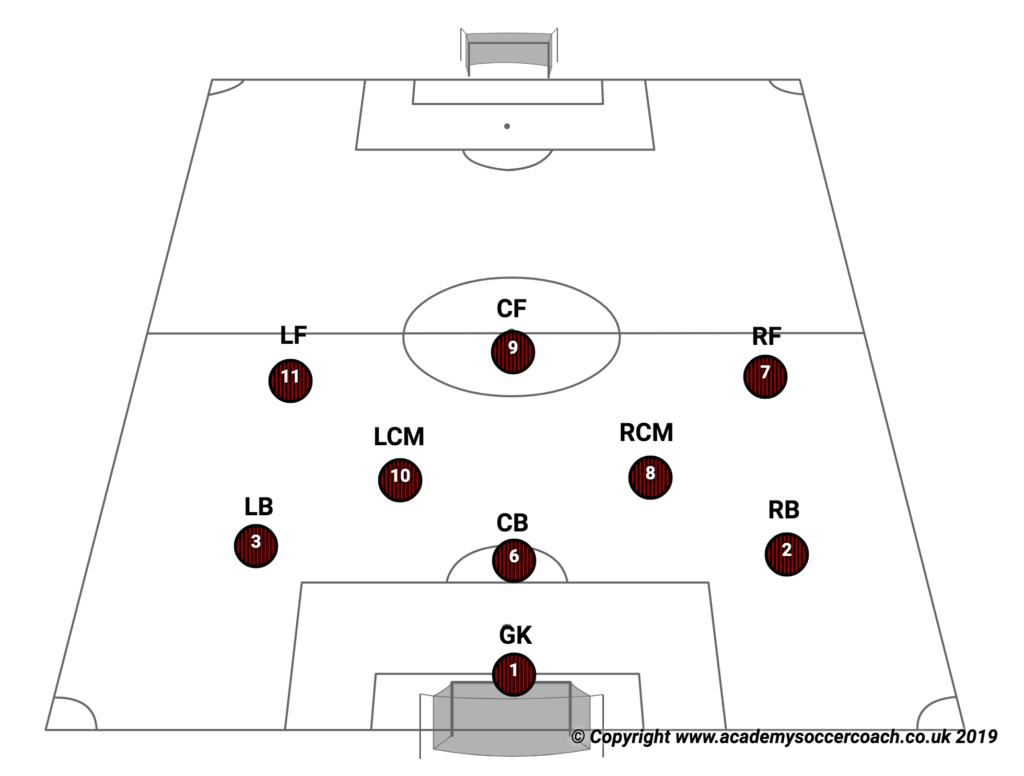
This positioning of players provides support (1st, 2nd, and 3rd attackers and defenders) throughout the field. The shape lends itself to the formation of triangles in possession and a layering of defenders when out of possession.
It must be emphasized that the discussion on system of play is based on an understanding of our club tactics and style of play. These are summarized in the curriculum. As a refresher, here are the concepts that we are emphasizing:

This system of play is intended as a transition from the 7v7 (1-3-2-1) system to an eventual 11v11 (1-4-3-3) system. The 7v7 system is the same as the 9v9 system except for the addition of the 7 and 11 players. In the 11v11 system, we will eventually add two center backs (4 and 5) and push the 6 into the midfield.
In this system, the key players are the 6, 8, and 10 – the “midfield triangle” in our eventual 11v11 format. It is important that all 3 of these players are communicating with each other – both verbally and non-verbally, and are continually checking in with each other.
The 6 needs to be composed, mature, skillful with the ball, a good 1v1 defender, and a strong and accurate passer of the ball. We would generally consider the 6 as one of our captains of the team. The 6 must be able to read the game, determine threats, and make conscious decisions about how to deal with threats. In possession, we would look for the 6 to help the team move through the thirds and to provide a backward passing option to switch the point of attack.
The 8 and the 10 can be played in one of two ways – either (1) as “equals” who are both responsible for link play, supporting the 6 in the defensive role and supporting the forward line in the attack or (2) with the 10 as a more “attacking” midfielder (combining with the 9) and the 8 as a more “box-to-box” midfielder who has responsibility to help the 6 and to manage the game in front of the back line. With mature teams in the 11v11 format, the 8 and 10 adopt the distinct roles (option 2).
The 1-3-2-3 shape represents a basic set of zonal responsibilities. In the run of play, the team may form different shapes and layerings depending on the position of the ball and the opponents.
Defending third
In the defensive third, there are two basic choices – a 1-3-4-1 (dropping the two forwards to midfield positions) or a 1-4-3-1 (dropping the two forwards and also dropping the 8 into the back line with the 6).
1-3-4-1
In this shape, the team is more compact with the forwards dropping down a level and providing defensive support on the wings. The outside backs (2 and 3) are tucked in to support the 6. The 1-3-4-1 is a reasonable choice if the opponent is playing with 2 forwards leaving the back line with a free player.
The danger is with the opponent running players into the wings and/or taking on our 7 and 11 in a 2v1 battle. If necessary, the 7 and 11 must track down to our defending corners – otherwise the outside back will have to go wide leaving a hole next to the 6. If the 2 or 3 does track outside, either a central midfielder (8 or 10) or forward (7 or 11) must slide into the back line to cover. It is highly desirable to put together training sessions to work on the pressure/cover roles when we are defending balls played into the wide positions in the defending third.
1-4-3-1
In the 1-4-3-1, we have our box-to-box midfielder (8) drop into the back line. The outside backs are responsible for the wide channels and the forwards (7 and 11) have both dropped and tucked in slightly to support the 10.
The advantage of this shape is that it addresses the issue of pressure/cover when the ball is played wide in the corners. It also simplifies the play for the forwards – who in the 1-3-4-1 might be required to run down to our end line when defending and into the other team’s half when we counter. Many forwards lack the stamina and mental fortitude to make these sorts of runs – either giving up on defending or attacking when pressured.
The 1-4-3-1 also looks more like how we will play at 11v11 – where many teams will typically form a 1-4-4-1-1 in their defensive end. A final advantage is that the 1-4-3-1 matches up better against teams that play with 3 forwards when compared to a 1-3-4-1.
In order for this to work, the 8 must be trained to drop into the back line when we are defending in our end and push out when we attack.
Middle third
In the middle third, we are looking to push out of our end:
Note that our 2 and 3 are playing “inside” of the 7 and 11 who have expanded (gone wider). The danger for us in the midfield is a loss of possession that results in a direct counter attack to our goal. In the 1-3-2-3, we only have the one center back (6) – that player will need support from a box-to-box midfielder (8) and/or the two outside backs. It is important that we train our players not to “overplay” our attacks – rushing up the field, abandoning our 6, and leaving us vulnerable to direct counters.
In more mature teams, we would look for the 8 to provide that consistent midfield support – in effect, acting as a “stopper” (with the 6 as a “sweeper”) and allowing our 2 and 3 to participate in the attack. Another alternative would be to allow the “strong side” back (the 2 on the right side or the 3 on the left side) to release up the field with the attack and have the other back slide to the middle to support the 6. With younger teams, keeping the back line connected in the midfield is a simpler option.
Final third
Here is one possible positioning of players in the final third:
Once again, we see the 8 taking more of a support role with the 2 and 3 taking wider positions in support of the attack. An alternative (as noted above) would be to keep the 2 and 3 more tucked in.
In this version, with the 2 and 3 holding the wide channels, we can bring the 7 and 11 more central to support the 9 and put more bodies in the goal scoring channel. If, in this version, the 2 or 3 make overlapping runs into the deep corners, the midfielders and forwards need to work actively to prevent any quick counter attacks with our back line out of position.
Note that as we move into the final third, the 2/3 and 7/11 have switched channels – the 7/11 coming inside and the 2/3 going outside. The 8 and 10 are responsible for side-to-side movements to support the ball and stop counterattacks. The width of the 2 and 3 provide passing options when we are under pressure and allow us to bring the 6 into the game to help us switch the ball from one side to the other.
Pressure/cover, overlapping and support
It is important that we teach our players to take risks in the pursuit of goals. However, we want to teach our players to be conscious of the environment, continuously evaluating the scene and determining a course of action that aligns with our style of play and the responsibilities (offensive and defensive) of their role.
Our system of play is designed to provide defensive support throughout the field. it is also the case that we want our players to create and exploit spaces within the field. One of our foundation principles is “Organize defense on offense”. In this context, we need to train our midfielders to understand when a back line player has joined the attack and then ensure that we cover the space that our teammate has vacated behind us. Activities that encourage overlapping and support, development of the 1st/2nd defender concepts (pressure/cover) are crucial in implementing our 9v9 system of play.